Ubuntu Tutorials, Howtos, and More


Sunday, February 25, 2007

13 Things to do immediately after installing Ubuntu

Article From: LINUX ON DESKTOP

In this article i describe some of the things to do immediately after installing ubuntu on your machine . Since most of the people reading this would be shifting from Windows to Linux with a system dual booting so i would focus more on making transition easy from Windows to Linux.


1. Enabling/Adding Extra Repositories
Ubuntu comes by default with only some of the repositories enabled because of licensing issue since downloading certain codecs and apps may be illegal in some countries so you have to enable these repositories/add new repositories to enable installation of these packages.

To enable new repositories go to (System -> Administration -> Synaptic Package Manager ) , type in the root password .Then Go to (Settings -> Repositories ), there enable all the check-boxes to enable all the repositories you need .


Also for installing some apps extra repositories are needed since they are not in the default repositories so go to third Party and add the following there

deb http://givre.cabspace.com/ubuntu/ edgy main main-all
deb http://ntfs-3g.sitesweetsite.info/ubuntu/ edgy main main-all
deb http://flomertens.keo.in/ubuntu/ edgy main main-all


deb http://mirror.ubuntulinux.nl edgy-seveas all


After doing this exit Synaptic Package Manager Fire up Console and type the following command to import GPG keys .

wget http://flomertens.keo.in/ubuntu/givre_key.asc -O- | sudo apt-key add -

wget http://mirror.ubuntulinux.nl/1135D466.gpg -O- | sudo apt-key add -


After doing this your system should be ready for installing extra application.

2. Installing ntfs-3g

ntfs-3g this is necessary if you have a ntfs drive in your computer ( Usually Windows XP installs on NTFS drive) and you want to read and write data to the drive you have to install this .

This can be installed as following type the following at the command prompt

sudo apt-get update
sudo apt-get upgrade

sudo apt-get install ntfs-config

Then type the following command

gksu ntfs-config

This is automatic configuration of ntfs-3g , enable read , write support and it should be configured.


these commands would back up fstab file if configuration goes wrong.

sudo cp /etc/fstab /etc/fstab.bak
gksu gedit /etc/fstab

Now one more thing you want your windows (NTFS) drive to be mounted automatically add the following entries to /etc/fstab
/dev/ /media/ ntfs-3g defaults,locale=en_US.utf8 0 0

Where /dev/partition is the partition which is NTFS drive , in my case /dev/hda1
/media/ this is just the directory you want to use as a mount point where windows drive would be mounted , you can very well use any drive you like.

now Restart ubuntu your windows partition should be working well.

3. Making Windows see your Linux partition


Windows XP lacks support for reading and writing files to Linux file system however external utilities like free Ext2 File system for windows allows Windows XP to read and write files to a Ext2 , Ext3 file system however ReiserFS file system is not supported .

You can get Ext2 file system for windows at the following link : -
(www.fs-driver.org/download.htm)


4. Installing flash-plugin

Macromedia Flash player is not installed by default but since we would be surely needing it while browing the net , installing it is necessary
it can be installed by following command


sudo apt-get install -y flashplugin-nonfree

5. Installing Microsoft True Type Fonts

If you are making a jump from windows to ubuntu you would surely miss the true type fonts that Windows uses , since Microsoft has released them free so they can be installed without a hitch in ubuntu (Though not distributed with Ubuntu) .

sudo apt-get install -y msttcorefonts

6. Installing unrar

RAR is one of the very widely used archives on Windows , however unrar tool to decompress RAR is not shipped with distribution and has ti be installed manually.

sudo apt-get -y install unrar


7. Installing mpg123

mpg123 is a very nice command line based mp3 player that can play mp3 files even on a slow processor based computer , further installing this provides a way of playing mp3 files from within the nautilus file manager . Hence i recommend installing mpg123

sudo apt-get install -y mpg123

8. Installing Adobe Reader

Though ubuntu comes with default evince reader for viewing pdf files , but i am sure you would like to use more complete version of pdf reader Adobe Reader 7.0 which is quiet professional and
more robust , the Linux version of Adobe Reader 8.0 has not been released but the version 7.0 is available and could be downloaded from the following website : -

http://www.adobe.com/support/downloads/product.jsp?product=10&platform=unix


9. Installing DVD playback support

Now this is a contentious issue , in some countries playing DVD files through DEcss is illegal so use it at your own will , anyways to enable dvd playback issue the following command at the command line : -

sudo aptitude install libdvdcss2


Note : the above commands would only work if you have added the repositories i had mentioned before the Seveas repositories.

However if you do not have these Repositories installed issue the following command to install the DVD playback support : -

sudo /usr/share/doc/libdvdread3/./install-css.sh


10 . Installing the extra multimedia codecs,players

Now you would surely want to install all the codecs for playing various media files and the players primarily xine,vlc,mplayer issue the following commands to install the multimedia codecs.


sudo apt-get install gstreamer0.10-pitfdll gstreamer0.10-ffmpeg gstreamer0.10-gl gstreamer0.10-plugins-base gstreamer0.10-plugins-good gstreamer0.10-plugins-bad gstreamer0.10-plugins-bad-multiverse gstreamer0.10-plugins-ugly gstreamer0.10-plugins-ugly-multiverse libxine-extracodecs w32codecs
vlc mplayer

This command would install most of the codecs for gstreamer multimedia architecture and vlc media player and Mplayer , as well as the dll files codec (w32codecs) for decoding various files whoose open source decoder are not available.

11. Updating the system

After installing Ubuntu you would surely like to update the system so that all the packages on the system are up to date to new version of the software .
It can be done by following steps , go to (System > Administration > Update Manager)
Now press the Check button and then Install updates to start the installation of updates to the ubuntu system.


12 . Installing beagle

Now Ubuntu does not come with beagle pre-installed maybe because it is still not a final 1.0 release still it is very nice and efficient for searching files and directories on Linux providing features similar to Google Desktop Search and Mac OS Spotlight anyways to install beagle issue the following command at command line :

sudo apt-get install -y beagle


13. Installing gdesklets

gdesklets gives user a collection of impressive widgets that can be placed on desktop this is similar to feature available on Windows Vista and Mac OS X , it does provide quite a good look to the desktop.

To install gdesklets issue the following command at the command line

sudo apt-get install -y gdesklets
after installation go to (System -> Preferences -> Sessions) There go to Start up program and add gdesklets shell , now every time gnome loads up you should see your gdesklets on the desktop.

This is how my desktop looked like with all the desklets (Widgets )

Read more!

Monday, June 26, 2006

Firefox

Firefox is a very secure and fast web browser. It has the ability to be skinned or "extended" with extensions. It has many features like tabbed browsing that people like it for. If you are using Internet Explorer on Windows to read this, press the link to it on the top of the page. ubuntu users can download it by runing "sudo apt-get install firefox" in their terminal.

Read more!

Dynamic DNS No-IP

If you have a dynamic IP from your internet service provider it gets annoying when they change your IP and you do not know it, therefore you are not able to connect to your computer remotely anymore. Well Dynamic DNS services fix that problem by assigning a domain to your IP address whenever it changes. This howto will cover getting No-IP, a Dynamic DNS client working.

First if you do not have a No-IP account, create one by going to no-ip.com and registering.

It will send an email to you so you can verify that you want to create account. Click the verification link in your email and it will send you back to the No-IP site.

Log in to the site with the account you just made and click Add under Hosts / Redirects.

Write whatever you want for the subdomain and choose a domain for it to be under. I chose howtonoip for my subdomain and chose to put it under their no-ip.org domain. Scroll down to the bottom and click Create Host.

Now you will need to install the client. Open up your terminal and run "sudo apt-get install no-ip".

Once installed run "sudo no-ip -C" and select your Internet interface from the list. Then enter your login information. If you added only one host to your no-ip account it will automatically use that. If not it will ask which one(s) to use. Next enter the update interval (in minutes). It will ask you if you want to run something at a successful update. I did not so I selected no.

Your configuration file was just created. Now whenever your IP changes this client software will automatically update the No-IP servers with your new IP. No longer will your ip change and you be locked out of your computer!

Read more!

Sunday, June 25, 2006

How to Order ubuntu CDs to you Mailbox!

For those of you who are missing out on ubuntu because you have dialup and do not want to pay to have cds shipped to you, well you can order them for free right from ubuntu! You can order ubuntu, edubuntu, and kubuntu cds for no cost at all. All you do is put your address and request the amount of cds you want! To order more then one like ubuntu and kubuntu at the same time, make an order for one you want then go to the other one and change your order. It will have both in the same order!
Below are the links to order the CDs.
ubuntu

Read more!

Saturday, June 24, 2006

Setup Your Computer to be a Router

If you have two network cards or some other means of connecting to the internet and a network card in your ubuntu computer, it can be a very powerfull router. You can set up basic NAT, do port forwarding, set up a proxy, and even do packet prioritization so your downloads dont interfere with gaming! This howto will cover setting up Webmin which will be used to configure masquerading, DHCP, and DNS servers. It also lets you configure port forwarding. QoS (packet prioritization) will be covered in a later guide. This guide is made using kubuntu to show that it will work with any version of ubuntu.

Webmin
Webmin is a web based computer management tool. It is similar to the web interface that you get from routers you buy at stores, but allows you to control most of the computer.
To install webmin, you must first go to its website at www.webmin.com and download the latest version in the top right. Download the tar.gz version into your user folder.

Once the download is complete extract it to a folder for example \usr\webmin. I extracted it into my user folder in this tutorial because this is just a live CD so it doesn't really matter. You may delete the tar.gz file after you extract it as it is no longer needed.

Before you install it you will want the package "libnet-ssleay-perl". So open the terminal and run "sudo apt-get install libnet-ssleay-perl". Now navigate to the directory the folder is (For me it would be "cd /home/ubuntu/webmin-1.280") and then run the command "sudo sh setup.sh".

Config file directory [/etc/webmin]:
# Leave as default, or change as you wish

Log file directory [/var/webmin]:
# Leave as default, or change as you wish

Full path to perl (default /usr/bin/perl):
# Leave as default, or change as you wish

Web server port (default 10000):
# Leave as default or change it to what ever port you want.

Login name (default admin):
# Leave as default, or change as you wish

Login password:
# Choose a password, it will not display anything while you type

Password again:
# Self explanatory

Use SSL (y/n):
# Of course 'y'

Start Webmin at boot time (y/n):
# Once agian... 'y'

It will not finnish up the installation and you will be able to login by using localhost:port or routerip:port like http://localhost:10000

Masquerading
Masquerading is also known as NAT. To enable it, login to Webmin, go to the networking section, and click on firewall. It will ask you to configure it now. press "Do network address translation on external interface:" and choose the external interface (the one that is connected to the internet) and click on "Enable firewall at boot time?" then click on "Setup Firewall".

Now you must add rules to your firewall to allow traffic coming from the internal network, loopback, and traffic related to an outgoing connection (so that you may recieve a response to your requests).
To allow traffic from the internal network, under "Incoming packets (INPUT)" press add rule. Give the rule a comment (name) like internal network and press the button by the "Accept" in green writing. Then down to "Incoming interface" put equals and put your internal interface, in the picture below it is eth0. Scroll down and press create.


Now do the same but put lo as incoming interface.

Now you must create another rule for existing connection. Put a comment and press accept. For incoming interface put equals and put your external interface (eth1 for me). Scroll down to "Connection States" and put equals and select both "Existing connection (ESTABLISHED)" and "Related to existing (RELATED)" and press create.

Now you must drop external connections that do not meet any of the other rules, so set the default action of "Incoming packets (INPUT)" to drop and press the button.

Scroll down to the bottom and press apply configuration.

Now go to the System section and click "Bootup and Shutdown". Click "Create a new bootup and shutdown action". Make the name "webmin-ipt" without quotes, make the description whatever you please, and for bootup commands, put "/bin/echo 1 > /proc/sys/net/ipv4/ip_forward" and make a new line and put "/sbin/iptables-restore /etc/webmin/firewall/iptables.save" then press create. Find the bootup command you just created in the list and click it then press Start Now.

Configure DHCP
In webmin, go to servers and press DHCP Server and click Module Config.
Replace (without quotes)
DHCP server config file with "/etc/dhcp3/dhcpd.conf"
DHCP server executable with "/usr/sbin/dhcpd3"
Command to start DHCP server with "/etc/init.d/dhcp3-server start"
Command to apply configuration with "/etc/init.d/dhcp3-server restart"
Command to stop DHCP server with "/etc/init.d/dhcp3-server stop"
Path to DHCP server PID file with "/var/run/dhcp3-server/dhcpd.pid"
DHCP server lease file with "/var/lib/dhcp3/dhcpd.leases"
and press save.

Now press "Add a new subnet" and put a description of this subnet. For network address, make it the same as the internal address but with 0 at the end, for example my internal NIC is 192.168.1.1 so I will put 192.168.1.0 for network address. For address ranges put the range of addrseses for your DHCP server to assign. For netmask put the same as your subnet, most are 255.255.255.0 and press create.

Once created, press the new icon that was just created with the network address you choose under it and scroll down to the bottom and click "Edit Client Options". Fill in Subnet mask with your subnet, default routers and dns servers with your internal IP and broadcast address with the internal ip but 255 at the end (for example my internal ip is 192.168.1.1 so I will put 192.168.1.255 for broadcast) and press save then press start server.

Your computer will now be a DHCP server, router, and DNS server. To do port forwarding, go to the firewall settings in webmin and go to the Network Address Translation (nat) IPTable. From there you can add rules to Packets before routing (PREROUTING).

Read more!

Thursday, June 22, 2006

How to add Multimedia Functionality to ubuntu

ubuntu does not come with much multimedia functionality because of legal issues so you may find that many files do not play. To fix this, you need to install some codecs and players form the restricted section. To do this, first follow the post "How to add Extra Repositories".

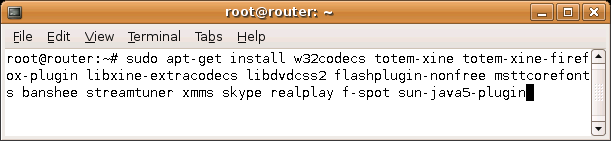
Open the terminal and enter the following in without quotes and answer "Y" to all the questions it asks.

"sudo apt-get install w32codecs totem-xine totem-xine-firefox-plugin libxine-extracodecs libdvdcss2 flashplugin-nonfree msttcorefonts banshee streamtuner xmms skype realplay f-spot sun-java5-plugin"


Once installed, you should have as much multimedia functionality as Windows minus DRMd files.

Read more!

How to add Extra Repositories

If you want to add more repositories for more packages, open the terminal and run "sudo cp /etc/apt/sources.list /etc/apt/sources.list_backup" to backup your current sources.list. Then run "sudo gedit /etc/apt/sources.list" to have gedit open sources.list. If you have kubuntu, use kate instead of gedit.

Once open, remove everything and past the following lines in.

## Add comments (##) in front of any line to remove it from being checked.
## Use the following sources.list at your own risk.

deb http://archive.ubuntu.com/ubuntu dapper main restricted universe multiverse
deb-src http://archive.ubuntu.com/ubuntu dapper main restricted universe multiverse

## MAJOR BUG FIX UPDATES produced after the final release
deb http://archive.ubuntu.com/ubuntu dapper-updates main restricted universe multiverse
deb-src http://archive.ubuntu.com/ubuntu dapper-updates main restricted universe multiverse

## UBUNTU SECURITY UPDATES
deb http://security.ubuntu.com/ubuntu dapper-security main restricted universe multiverse
deb-src http://security.ubuntu.com/ubuntu dapper-security main restricted universe multiverse

## BACKPORTS REPOSITORY (Unsupported. May contain illegal packages. Use at own risk.)
deb http://archive.ubuntu.com/ubuntu dapper-backports main restricted universe multiverse
deb-src http://archive.ubuntu.com/ubuntu dapper-backports main restricted universe multiverse

## PLF REPOSITORY (Unsupported. May contain illegal packages. Use at own risk.)
deb http://packages.freecontrib.org/ubuntu/plf dapper free non-free
deb-src http://packages.freecontrib.org/ubuntu/plf dapper free non-free


Press save and back in the terminal run "sudo apt-get update".


Read more!

Root Access with sudo and gksudo

ubuntu unlike many distributions does not normally have a user accessible root account. You are supposed to use one of these two commands when you need root access. sudo is for when you are in the terminal and need root access and gksudo is when you are in the GUI and need root access, for example you can press alt+f2 and type "gksudo appname".

If you need a root account for some reason, an easy way to do it is to open up the user account manager by pressing alt+f2 and typing gksudo users-admin.

Double click on the root account and you will be presented with this screen. You may change the root password from there.

You may now log in as root. Note that gdm (the login manager for ubuntu) might not let you log in as root so you will have to open the console and login and run "startx".

To add new users to sudo, open the terminal and type "sudo usermod -G admin username". If the user is already a member of other groups, you'll want to add the -a option, like so: "sudo usermod -a -G admin username".

If you prefer to use the GUI, open users-admin and double click the user you want to be able to sudo. Under the User privileges tab, check the box that says "Executing system administration tasks" and they will be able to sudo.

Read more!

How to Analyze Network Traffic with ethereal

If you want to see what is coming in and out of your computer or if you have a ubuntu computer as a router and want to analyze data coming in and out of your network there is a very simple way to do it. A program called ethereal can analyze all sorts of connections to and from your computer.

To get it, open the terminal and write (without quotes) "sudo apt-get install ethereal" and answer "Y" to all the questions it asks.

Once installed you will want to run it as root by pressing alt+F2. Type "gksudo ethereal". It will ask for your password and then once open it will look like this.

To start capturing, press capture and press interfaces. You will be presented with the window shown below. Either press capture on an interface to begin immediate capture or press prepare to set more advanced options.

Once you begin capturing there will be another window that looks like the one shown below. Once you are done capturing, press stop and it will analyze the data.

Once analyzed you will be presented with a screen the looks like the one shown below.

This will contain all the data captured on the selected interface before you pressed stop.

Read more!

How to Install other desktop environments

Ubuntu (kubuntu, edubuntu, xubuntu) is capable of many different desktops. The main ones are GNOME, KDE, and Xfce. The main difference between the different ubuntu's is the desktop environment they come with.
Ubuntu and edubuntu come with GNOME, kubuntu comes with KDE, and xubuntu comes with Xfce. Below are screenshots of the different distributions.

ubuntu (GNOME)
edubuntu (GNOME)
kubuntu (KDE)
xubuntu (Xfce)

If you installed one version of ubuntu but would also like a different desktop environment, open your terminal and type the following without quotes and answer "Y" to all the questions it asks.
For ubuntu GNOME "sudo aptitude install ubuntu-desktop"
For edubuntu GNOME "sudo aptitude install edubuntu-desktop"
For kubuntu KDE "sudo aptitude install kubuntu-desktop"
For xubuntu Xfce "sudo aptitude install xubuntu-desktop"

Once installed, you may change sessions before logging in to another desktop.

Read more!